This guide will show you how to add a new signer to your Stellar account and how to remove a signer from your account using the multisignature functions.
Stellar Multisig
You can increase the security of your Stellar Account (your wallet) by adding additional signers to your main account. You can also remove a signer if you know that a signer’s secret key has been compromised. You can even remove the original secret key (the master key) from having any signing power on your account. This is useful if someone helped you create your account and now you want to remove their access, or if you need to give someone temporary access to your account.
Step 1 – Create Your New Signer
First, you will need to create the new signer. You can generate a keypair from:
https://www.stellar.org/laboratory/#account-creator?network=public
You will need to copy the new Public and Secret key to a safe place. If you lose the secret key, you will never be able to access your tokens again.
Step 2 – Add Signer to Your Account
Now that you have your new keypair, we will start building the transaction to add that account as a signer to your main account. Go to the Stellar Transaction Builder and make sure you are on the PUBLIC network.
Source Account: Here you will put the public key of your main account (the one you are adding a signer to).
Transaction Sequence Number: After you add your source account, a blue box will appear to fetch the next sequence number. Click on it to generate the number.
You can ignore Base Fee, Memo, and Time Bounds.
For the “Operation Type” you will select “set options.”

Ignore: Inflation Destination, Set Flags, Clear Flags, Master Weight, and the Thresholds.
Signer Type: Select Ed25519 Public Key
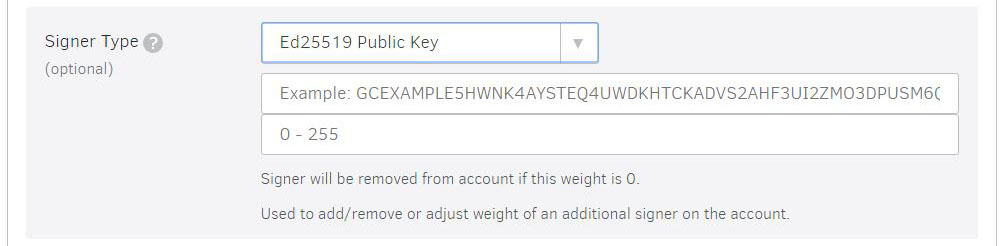
In the first box you will add the PUBLIC key of the new keypair you created in step 1 (your new signing account).
In the second box, put a “1”. This will give the new signer a weight of 1, which means it can approve any transactions just like the original signer.
Scroll to the very bottom and click the blue button “Sign in Transaction Signer.”
On the next page, scroll down to the “Signatures” box. Here you will enter the SECRET key of the main (original) account to sign the transaction. Once you add the secret key, scroll to the very bottom of the page and click the blue button “Submit to Post Transaction Endpoint”.
On this page, you will scroll to the bottom and click on “submit”. This will submit the transaction to Stellar, and you should get a successful response.
You can check to confirm that the new signer was added by going to stellar.expert and entering your public key in the box at the top right of the screen. This will bring up information about your account, including the number of signers.
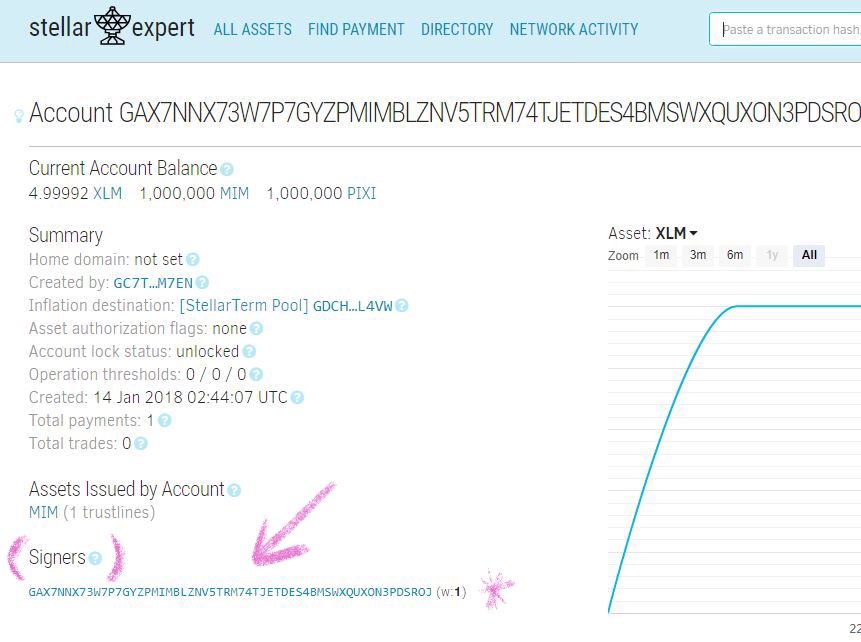
You will confirm that the public key for your new signing account is showing here as a valid signer for your account. In the example photo there is only 1 signer for the account, so an additional signer has not been added yet.
Step 3 – Remove Master Key
At this point, you can use either the original Secret Key or the New Secret Key to sign any transactions for the account. If you are looking to secure your account after someone else has gotten access to your master key, you have two options.
- You can change the Low, Medium, and High Thresholds to 2, which would require BOTH keys in order to complete a transaction. So, anyone that only has access to one of your keys will not be able to mess with your account. To do this, you would follow the steps above to add a signer, but instead of adding a signer, you will change the thresholds to 2. This will require both the master key and the new key to sign any transactions on your account.
- Another option is that you can remove the signing power from the original secret key, otherwise known as the “master key.” If you do this make SURE that you have not changed the thresholds.
To remove the original secret key’s signing power, we will set the master weight to 0.
Go to the Stellar Transaction Builder and make sure you are on the PUBLIC network. For the source account, you will put the public key for your main account.
After you add your source account, a blue box will appear to fetch the next sequence number. Click on it to generate the number.
You can ignore Base Fee, Memo, and Time Bounds.
For the “Operation Type” you will select “set options” just as we did above.
Ignore all the boxes except for “Master Weight,” and set that to 0.

Leave the Thresholds blank. They will stay at 1, and the new signing key will continue to work.
We will sign this transaction just as we did above.
Scroll to the very bottom and click the blue button “Sign in Transaction Signer.”
On the next page, scroll down to the “Signatures” box. At this point, you can use either the master key (the secret key that matches this account) or the new secret key from the signer we added above. **If you did not create any additional signers, you will be permanently locked out from your account once this transaction is complete.**
Once you add a signer to the signatures box, scroll to the very bottom of the page and click the blue button “Submit to Post Transaction Endpoint”.
On this page, you will scroll to the bottom and click on “submit”. This will submit the transaction to Stellar, and you should get a successful response.
After this transaction, you will no longer be able to use the master key. You will only be able to use the new signer that we added to the account. Be very careful, if you mess this up you will be permanently locked out of your account. There is no way to recover.
If you have any questions, just leave a comment below!
Follow me on twitter @thecoinpixie


1 Comment
Pingback: How to Send Sparkles to a Friend – Crypto Sparkles